
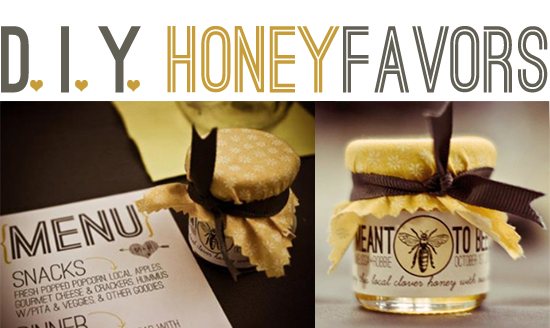
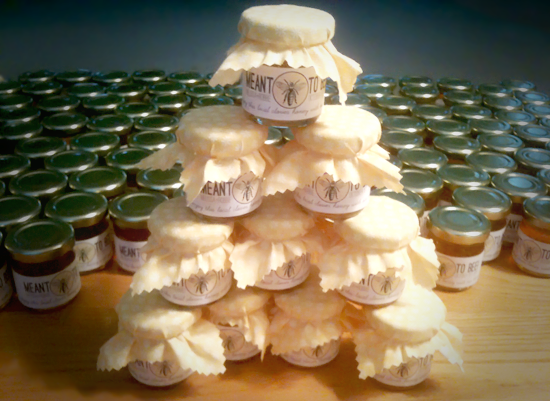
For our wedding favors, we wanted to be able to give our guests something unique and handmade to take home with them to remember our special day. My sister and I came up with the idea to make personalized mini jars of honey with ribbon-tied fabric tops. Robbie and I both love honey, and the name Melissa actually means "honeybee," so this was perfect for us. These favors are especially cool in that they can be used for any type of party, not just weddings. Today, my sister and Matron of Honor Morgan is going to share how she made these pretty little favors, and show you how you can make them too!

Hello Bubby and Bean readers! I'm still beaming from Melissa and Robbie's wedding on Saturday. It was beautiful, with so much attention to detail. They worked for many months to make almost everything themselves, and created an atmosphere that combined vintage and modern, rustic and urban, with a handcrafted touch. Getting to be a part of that through these honey favors was so much fun.
Before you start, find a nice big table or area of the floor to work on, and get together all of your supplies.

A note about the labels: I was lucky because Melissa is very handy when it comes to graphic design (have you seen her art shop?!), and she designed them herself. But you don't need to be a designer or a Photoshop or Illustrator pro to make these favors look pretty. Just some text on the labels with your names and wedding date, the name of your event or party, or even a quote or poem works, and you can use a simple program like Word for that.


2. Use your pinking shears* to cut your fabric into 4x4 inch squares. Cut enough for each jar. (*Scissors with a zigzag pattern that prevents fraying and creates a pretty edge)

3. Set a fabric square on top of the lid of a jar, and fold excess over the edges. Then pull a clear hair tie or rubberband over the top to hold the fabric in place. Repeat for each jar.
4. Cut your ribbon into 8-10 inch pieces with your pinking shears or a regular pair of scissors. Cut enough pieces for all of the jars.
5. Tie a ribbon around each jar and secure with a knot. If you'd prefer a bow to a simple knot, you'll need to cut your ribbon strips 2-3 inches longer. Fold the ends of each tied ribbon in half with your fingers, and trim at an angle from where the corners meet toward the fold to create a decorate v-cut.
 |
| Photo by Danielle Moses |
Thanks for letting me share this tutorial with you! If you decide to make these favors for an occasion, make sure to leave a comment or contact Bubby and Bean to let us know. Melissa and I would love to see them!

For more DIY projects, wedding ideas, and other goodness, make sure to follow or subscribe to Bubby and Bean! You can also find us on Twitter, Pinterest, and Facebook.


 |


That is such a fantastic idea. LOVE this. Makes it so personal and fun for the guests!
ReplyDelete:) Anna
such a great idea!
ReplyDeleteSuper cute! Homemade jam would be wonderful, too!
ReplyDeleteThese are super cute! I want to make these for my wedding (if i ever have one hahaha). Thanks for showing how to make them!
ReplyDeleteThat is such a sweet idea! I am loving it - honey for a wedding favor - insane you are! All of you!
ReplyDeleteabsolutely adorable <3 your wedding guests were very lucky!
ReplyDeleteThose are gorgeous! I'm obsessing a little bit about things in jars at the moment. So many possibilities!
ReplyDeleteThanks so much for your comments everyone! Morgan's so glad you all like the tutorial. Don't forget to send us pictures if you make these for your event!
ReplyDeletexo,
melissa
that looks like one major undertaking! it's very original. i like the bottom black & white photo of you together.
ReplyDeleteThis is an awesome idea for wedding favors! I love it, and I think there's nothing nicer than a jar with a cute fabric cover, for honey or jam or anything (:
ReplyDeleteThank you for the lovely comment in my photography post, it made me smile!! Have a lovely day!
-Sandra
This is such a great idea, and they are so cute!!
ReplyDeletethis is so cute, i love it! i would have never thought to try it because honey gets so sticky and messy, but they look like they turned out well!
ReplyDeleteI am absolutely doing this. Thanks for the how to!
ReplyDeleteI found this through Stumbleupon, and oh my gosh, cutest idea ever! We are definitely using these for our wedding. Thanks so much for the tutorial. I love your blog and plan to be a regular visitor!
ReplyDeleteKelly from Austin
Great idea! So sweet!:)
ReplyDeletei love this idea! adorable. i'm planning on using it for my wedding this Fall. one question- how wide was the ribbon you used? Thanks!
ReplyDeleteSo glad you like it! The ribbon was 1/4 inch wide.
DeleteWhat a great tutorial! So easy to do!
ReplyDeleteAnyone have any tips on how to get the honey in to the jars? I have the jars and a 5 gallon bucket of honey and I have no clue how I am going to get the honey in the jars without a sticky mess!! Thanks :)
ReplyDeleteHi Britney, using a funnel will do the trick! :)
DeleteI know I'm late on this blog, but I'm just finding this out from Pinterest... I am Sooooo in love with this idea! My fiance and I agree this will be our favors :0). I would just like to know where you got the honey jars pre-filled from?? I would really appreciate the extra help... Thanks!
ReplyDeleteI am late on this post, but I am loving this idea!!! My fiance & I are definately going to do this favor, since everyone calls me "BEA"(bee) for short. Perfect irony & gift to make. I just need help trying to find honey pre-filled jars in bulk... How did you get yours?
ReplyDeleteThank you!
Beatriz & Michael
Hi Bea! Try http://www.ebeehoney.com xo, m
DeleteThis is absolutely wonderful! I just got most of the supplies to do this for my own wedding! :)
ReplyDelete2 questions - what kind of fabric did you use? Also, did the pinking shears really stop them from shredding or did you use a sealant?
Thanks for the wonderful idea!
This is absolutely wonderful! I just bought most of the materials I need to make these for my wedding! :)
ReplyDelete2 questions for you - what kind of fabric did you use? and did the pinking shears really stop the fabric from shredding or did you use a sealant?
Thanks so much for this lovely idea!!
We used plain old woven cotton fabric. The zigzag pattern created by the pinking shears does deter fraying. It someone were to wash the piece of fabric, it would fray, but most people discard it once they open the honey as it's just for decoration. Hope that helps! xo, m
DeleteJust love this idea! We just shared it with our followers on Pinterest!
ReplyDeleteWhere did you order your labels from?
ReplyDeleteWe designed them ourselves in Photoshop and printed them out on address labels. :)
Delete