

I absolutely love the relaxed, rustic look of flowers arranged in different sized and shaped jars, so we started collecting random jars to use as vases at our wedding about six months ago. We've accumulated quite a few of them, and I started thinking that in addition to the vases, it would be cool to do something else with them that would complement the vintage, handmade aesthetic of our wedding. I gathered pages from an early 1900s Sears Roebuck catalog that I found at an estate sale along with some other supplies, and used them to create several decoupaged candle holder lights. I think they'll look really elegant lit up outside at the reception, and they'll also be pretty right here on our back porch. Making these luminaires was a fun afternoon project, so I decided to put together a tutorial so you can create them too!
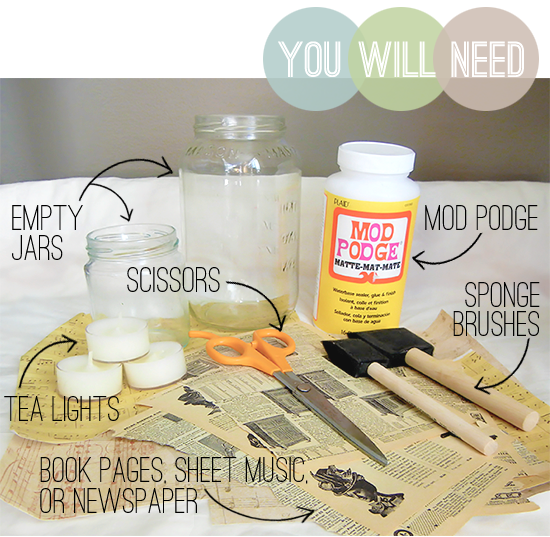
Gather your supplies, and find a nice big table (or, if you work like I do, the floor). Mod Podge can get a little messy, so place some newspaper or an old sheet over your work surface. While you're at it, put on your favorite music. Music makes every project more fun. Promise.

1. Using a pair of scissors, cut your pages or newspaper into small pieces and strips. I cut them into different sizes and shapes, which creates a really nice textured effect when they're layered on the jar.

2. Dip a sponge brush in the Mod Podge, and coat the back of one of your cut pieces. Place the piece onto the jar (with the coated side touching the jar). Press firmly and smooth out any bubbles or wrinkles.

3. Continue to coat each strip with Mod Podge and place onto jar, overlapping/layering pieces slightly. The area of the jar to be covered is up to you. I chose to make each one a little different. I layered my paper on one jar almost completely, and on another, I left some room at the top and the bottom so the paper formed a band.

4. Once the jar is covered, apply another layer of Mod Podge over the top of the paper. This will form a protective seal. Use a damp cloth to remove any excess that may have gotten on the glass. Allow to dry, then repeat with one more coat.
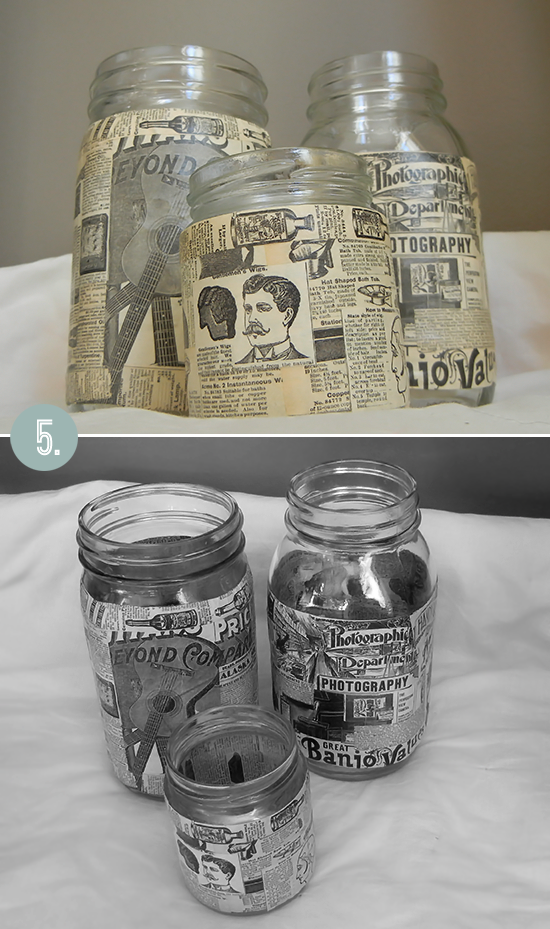
5. Repeat step 4 for each jar, allow to dry, and you're ready to drop in your tea lights and illuminate!

This D.I.Y. project is inexpensive, easy and eco-friendly. And the best part is that the finished jars have endless uses in addition to candle holders.

You can use them as creative containers for your kitchen/office/craft room, attach wire for hangers to create lanterns, or arrange them on tables for primitive-chic centerpieces. They would also make awesome handcrafted party favors or gifts!
Be sure to let me know if you make this project. I'd love to see photos!

CHECK OUT OUR OTHER DIY PROJECTS RIGHT HERE.


 |


Melissa, I love them! What a great idea! What do you use to edit your photos? I'm looking to revamp my blog. I got a new camera and need to show it off!
ReplyDeleteWhat a fabulous idea!
ReplyDeleteThey are beautiful!
ReplyDeleteO_O Whoa... I love this idea. I'm going to bookmark this for sure.
ReplyDelete-Robots in Trouble
WOW, these are *gorgeous*!! What a fabulous idea!! This tutorial is just gorgeous too, so nicely laid out and explained. Thank you I can't wait to try it!!
ReplyDeleteThese are adorable! Awesome idea, and I love how easy and inexpensive it is!
ReplyDeletevery nice! i love them illuminated...they will look so pretty at your reception!!
ReplyDeleteWe did this once with tissue but I love the idea of using b/w newspaper. It looks more sleek, less kid-crafty.
ReplyDeletethose look super cool! i am totally going to put this in my next 'bookmark dump' feature :)
ReplyDeleteThanks for sharing! I have tons of jars lying around waiting to be used. Some are for jarred pasta sauce, but the rest will be for arts and crafts.
ReplyDeletelove it! thanks for posting!
ReplyDeleteThanks everyone! It had been a while since I came up with a DIY idea that I actually executed instead of adding to the never-ending "to do sometime" list in my brain. :)
ReplyDeleteJustine, I use Photoshop for all of my editing!
xo,
melissa
as soon as i saw the 1st mason jar photo, i thought these will be perfect for melissa's wedding. then later read, that's exactly what you'll use them for. very clever idea!
ReplyDeletehttp://honeybeelane.blogspot.com/
These look so cool! I love it! I definitely want to give it a try.
ReplyDeleteoh man, you're crafty and sweet! I think i'll stay ;)
ReplyDeletewww.adayofk.blogspot.com
Thanks for your sweet comment on my blog earlier.
ReplyDeleteI love this tutorial, there is something so romantic and rustic about lights in jars. I really like the addition of vintage papers too.
I saw this and thought of you http://www.bloggerswardrobe.com/ have you heard of it?
These look absolutely fantastic!
ReplyDeleteThis is such a cute DIY! I absolutely love it ^^ these candleholders would look so lovely on my outside table, on a breezy summernight... x
ReplyDeleteHow cool is that! As if we are reading our minds ;))
ReplyDeleteWhat a lovely project! I have so many jars saved up for no reason, but I knew I wanted to make something out of them :)
ReplyDelete