
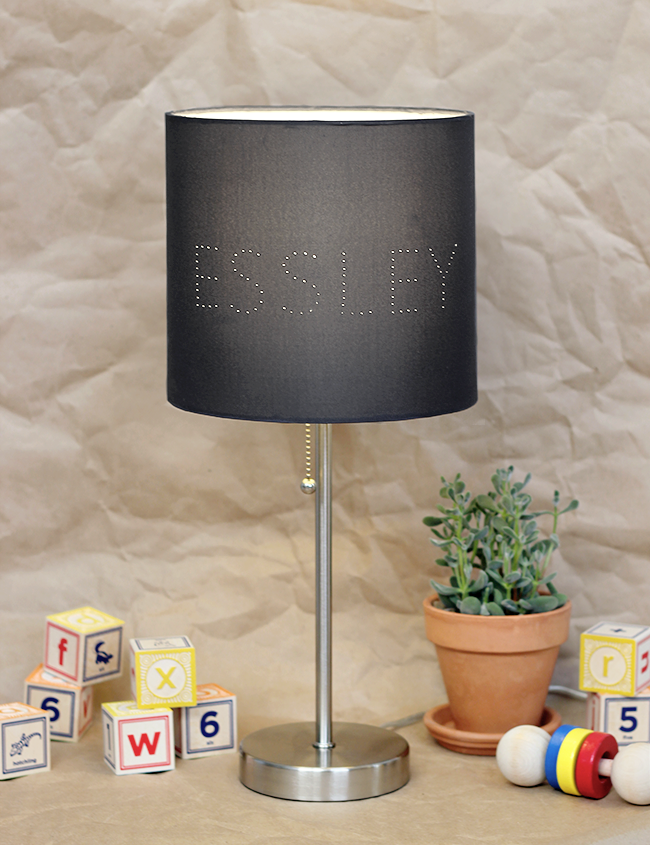

Almost nine months after our daughter Essley was born, I am finally getting around to finishing up her nursery. I still need to hem the curtains, but other than that, the only final detail missing has been a table lamp. Her room is gray, white, and black with pops of vibrant primary colors, and I wanted something simple that would still be fun without being over-the-top. I already had a dark grey lamp shade, and I thought about decorating it with her name, but I didn't want to use paint or stencils. The other day, while looking through all of the attachments of my Dremel® Micro™ 8050, I came up with the idea to use it to create cut-out style dots to form the letters of her name. I thought it would look so pretty to see the hints of light shining through when her room was dark, and it would be a sweet, subtle way to personalize it just for her. My husband and I worked on this project together, and we loved the way it turned out, so I'm sharing it with you guys. Obviously, this doesn't have to be for a nursery or kid's room either - you could use any name (or any word) you wanted.

- Dremel® Micro™ 8050
- Lamp base
- Lamp shade (cylinder or drum shape)
- Light bulb
- A measuring tape
- Masking tape
- A fine point marker
- Two copies of your name template (see details below)


1. Begin by creating your name template. To do this, measure around the circumference of your shade with a measuring tape, in order to get an idea of the width that you'll need your name to be. You're going to be "punching out" the name on two sides of your shade, so you'll want the width of the name to measure 4-5 inches inches less than half of the circumference of the shade. Our shade measured 27.5 inches around, and half of that is 13.75 inches, so we made our name template 9 inches wide. Once you know the width you'll need, create the template by choosing a dotted font, then typing out the text in the program of your choice. (I used Photoshop, and the font I used is called National First Font Dotted, which can be downloaded here. Another option is to create dotted text using a handwriting worksheet like this one.) After you've finished creating your template, print two copies and trim them down.


2. Next, attach the templates to the inside of the shade with tape. To do this in a way that is centered properly, start from the seam of your shade, measure a quarter way around in both directions along the bottom, and make a tiny mark on each side (on the inside at the bottom of the shade). Repeat this along the top. Then measure halfway from the top mark to the bottom mark on each side, and make another small mark on the inside of the shade at the halfway point for each side. Center your name templates on top of these marks (the middle mark on each side) on the inside of the shade, then attach with masking tape.


3. Use a fine tip marker to mark each dot on the outside of the shade. If you're in a dark room, it may be difficult to see through to the templates, so make sure you're in a well lit space. Although our shade was very dark grey, I did this sitting by a window and was able to see the template dots with no problem.


4. Now comes the fun part. Using your Dremel® Micro™ 8050 and the 105 attachment (carving/engraving), create small holes on each of the dots you drew in step 3. To do this, make sure you choose the highest speed (28), then set the tip on top of each dot to "drill out" your holes. Be gentle and let the tool do the work; the Dremel® Micro™ 8050 is the most powerful and precise cordless rotary tool that Dremel has ever produced, and will create perfect, uniformly sized holes with very little effort. Continue this with each dot until the names on each side are completed.

5. Put your shade on your lamp base, insert your lightbulb, turn on the lamp, and watch your name light up!

This project was a lot of fun, and I absolutely love the finished product. And best of all, it was easy - in large part thanks to the Dremel® Micro™8050. Most piercing tools would have caused the inside of the lamp shade to crack, but the Micro's fluid movements prevented this and allowed for perfectly uniformed holes. This little tool is no joke. It's super lightweight and easy to handle in tight spaces, but it's packed with features that are heaven to a DIYer: a soft grip, LED front-end lighting to illuminate projects, a docking station that continually charges, and an 8V Max Lithium-ion battery. It can cut, carve, engrave, sand, grind, sharpen, clean and polish. It's also fully compatible with all Dremel rotary tool accessories. We've already made a list of projects we plan to create with it soon. If you are into DIYs like we are, you can purchase a Micro 8050 of your own online at Amazon.com and HomeDepot.com for $89 USD. For more information on Dremel products, project ideas and problem-solving tips, visit www.dremel.com.
And here's some great news before I go… Dremel wants to celebrate its fans' brilliant projects, work and ideas! Now through October 12, share, tweet or post photos on Facebook, Twitter and Instagram that depict your brilliant ideas using the hashtag #MyBrilliantIdeaSweeps for the chance to win weekly prizes, including free tools and handmade gifts, or the grand prize: a custom-engraved Honda scooter and a Micro 8050. Visit www.facebook.com/dremel for rules and to learn more.
Have you ever done any craft projects involving lamps or lighting? Do you have any fun DIY projects or ideas involving a Dremel that you can share?

Thank you for supporting Bubby and Bean by allowing me to post occasional sponsored content. Sponsored posts feature only products or services that I genuinely feel would be of interest to my readers. I was selected for this opportunity as a member of Clever Girls Collective and the content and opinions expressed here are all my own.
ALSO FIND US HERE: BLOGLOVIN' // INSTAGRAM // FACEBOOK // TWITTER // PINTEREST
 |


Thats really cute and looks simple. I feel you could do the same thing with an awl. It might be a little bit more of a hassle but no extra machines needed!
ReplyDeleteActually an awl (or any similar type of spike tool) would cause the inside of the lamp shade to crack. That's what's so great about the Dremel for this project. When it's set at the highest speed, it's able to pierce the holes in a fluid motion without cracking. I love how it's so great on delicate objects in that way.
DeleteThis is so cute and such a great idea!!! I have a Dremel that my parents gave me as a graduation gift a few year ago but now I want the micro one haha!! I bet the lamp makes a cool reflection on the wall too.
ReplyDeleteThe only light-related projects we've done are installing them (which is mostly my husband doing it while I stand there and tell him not to fall) or spray painting thrift store finds.
ReplyDeleteI'm dying to see pictures of her nursery. You're sharing them with us, yes? :-)
Yes, soon! It's always so messy and I still haven't hemmed the curtains but considering the fact that she's almost 9 months old, it's a little ridiculous that I still haven't shared it. I'm definitely going to put it on the editorial calendar for October. :)
DeleteWhat a fun project! Aren't Dremels great!
ReplyDeleteWhat a cute idea and it turned out fabulous! I like that the tool is cordless :)
ReplyDeleteThis is great! You could make cute shapes too!
ReplyDeleteThis is SO cute! Totally doing this for Jemma's room.
ReplyDeleteWhat an awesome project and idea, Essley is a very lucky lady!
ReplyDeleteThis is such a cool idea! I want to make one of these with a fun saying on it. Now I just need a Dremel Micro! =)
ReplyDeleteHow cute is that!!! Essley's name in lights!
ReplyDeletethis is such a cool idea. i know what i'm doing this weekend!
ReplyDeleteThis is a great idea. I've been buzzing around to get Zander's room together before he comes. His colors are white, gray, and blue. :-) I don't have a light yet... His room would be great with a lamp like this!
ReplyDelete-Lara @ Methodical Living
http://methodicalliving.blogspot.com
What a cute idea - that's genius! :D
ReplyDeleteThis is too cute! Way beyond the scope of my DIY abilities - I'm so klutzy that I'm not even really allowed to use sharp knives, never mind any actual tools ;) But still, I love the idea of it and it turned out so beautifully.
ReplyDeletexox,
Cee