


Over the weekend, Robbie and I went seed shopping for this year's garden. Last year, after we planted the seeds, we quickly scribbled on wood scraps to mark each plant. These messy garden markers worked just fine (at least the ones on which we could actually read our handwriting), but they didn't look very nice. So I thought it would be fun to use some supplies I had sitting around the house to whip up some plant markers/stakes that were a little more attractive. I love the minimalist look of classic black and white, and (as you can probably tell from the blog's design) I'm a fan of triangles and arrows. With that theme in mind, I grabbed some wooden craft sticks, white paint, a black marker and a few other supplies, and made these plant markers in less than an hour (including 30 minutes of drying time).

Before you begin, gather all of your supplies and lay some newspaper or a piece of scrap kraft paper out on a table. (And as with all of my tutorials, I have to suggest putting on your favorite music too. Music makes every project more awesome. This is the truth.)
If you don't have all of these specific supplies, this project is easy to improvise. In place of craft sticks, you can use popsicle sticks or even actual wood garden makers (with pointed ends). If you don't have white acrylic paint or would prefer pops of color, you can replace the white paint with bolder colors. And if you don't have anything on hand that would work, you can run out to the craft store and easily get everything here for less than $10.

1. Tear off a small piece of masking tape or washi tape (I used washi tape because it's what I had in the house), and adhere it to a craft stick so that the top of the tape is about half way between the top and the bottom of the stick. Then press down to adhere the tape and stick onto your newspaper or kraft paper. (This will prevent the stick from moving around when you paint.) Repeat this step for all of your craft sticks. *TIP: If you want to make a couple of 'just for fun' decorative markers, try experimenting with the placement of your tape leaving open spaces to form triangles or other shapes.

2. Pour a little paint in your paint tray or on a saucer. Use the foam paint brush to brush a couple of coats of paint onto the top half of each craft stick. (The unpainted area will be inserted into the dirt.)

3. Once all of the sticks have been painted, allow them to dry for at least 30 minutes.

4. After the sticks are completely dry, remove the tape and discard.

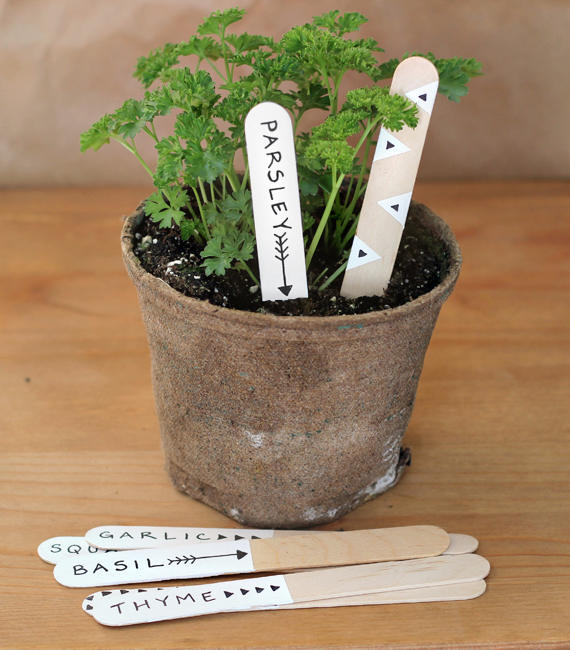
5. Now comes the fun part! Use your permanent markers to decorate the painted halves of the craft sticks by writing the names of your plants or seeds and then adding arrows, triangles, or whatever embellishments you like.


6. Finish all your sticks and place in your seedling pots, plants or garden!


Now I just have to patiently wait for the rest of the seeds to grow! If you are planting a garden this year and decide to make these, I'd love to see pictures. Enjoy!


 |


I adore my condo & I adore my lil cat but it makes gardening a lil tough! I wish I could have a rosemary plant to last throughout the spring! Ooo and mint! I would so make these adorable labels if I had them!
ReplyDeleteErgo - Blog
The garden markers are very sweet, I love how creative you were with the designs... I can't wait to get our garden started!
ReplyDeleteSo cute. We need to go shopping for our garden stuff, too. I have a few seeds, but I want to start our tomatoes and peppers as little plants instead.
ReplyDeleteWhat fun designs! Love the triangles and arrows.
ReplyDeleteI engraved some bamboo plant markers for my mom last year...they were so fun to make!
Great tutorial! I'm going to try this for sure, I love potting around on our terrace. Thanks for sharing
ReplyDeleteaw these are adorable! Such a simple idea
ReplyDeleteHannah xx
These are so cool!!! Way prettier than anything you could find in a store!! I'm going to try these next weekend for our plants. :-D
ReplyDeleteI love these! Any chance you'd sell them? =) I am so bad at crafty stuff although maybe I could do this project if I tried!
ReplyDeleteNot planning on selling them - just made them for fun. :) But it is the easiest project ever and I promise you can make them too! xo, m
Deletewhat a cute idea! i like the triangle designs.
ReplyDeleteCute and classy -- and your parsley is off to a good start.
ReplyDeleteParsley, sage, rosemary and thyme.....
such a lovely idea for Spring!
ReplyDeleteThanks for your comments! I'm glad you guys like the plant markers. :) xo, m
ReplyDeleteI love how sweet and simple these are. So dang darling!
ReplyDeleteLove, Richelle from Lynn+Lou
Love the simplicity to these. Your designs are so cute!
ReplyDelete-Courtney
www.alwaysrooney.com
These are adorable! Such a fun idea.
ReplyDelete