My sister Morgan is kindly filling in for me again today while we're in the final stretch of making our way home from our trip. Along with possessing all of the cooking genes in the family and holding the title of most bad ass psychology teacher this side of the Mississippi, Morgan also paints a mean nail. Going to her house is like visiting a mini nail salon (with the added perk of not having to pay for my manicure). In fact, Morgan is quite the beauty guru (just check out her 5-minute smoky eye tutorial). See you tomorrow! xo, melissa
Yes, I'm back again for the second week in a row! This time, I'm taking a break from my usual recipe contributions to share a simple technique for sponge painting gradient nails in two tones. There are all sorts of ombre-type nail methods out there, but this is the one that I most often use, for one reason: it's easy. I also like the textured appearance, as well as the effect of mixing two contrasting shades.
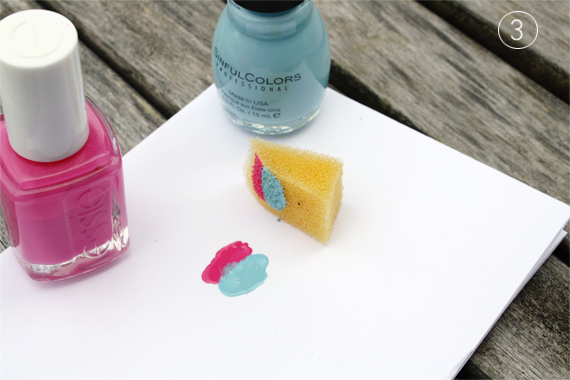
SUPPLIES: polish remover // nail polish in two shades* // sponge // paper // paint brush // top coat
*Choose contrasting nail colors to create your two-tone effect. (I don't usually pair bold shades with pastels, but I ventured outside of my comfort zone for this one. You know, live a little and stuff.) If you're in a more traditional ombre mood, go for a lighter and darker shade of the same color.
1. Cut/file your nails, remove any old polish, wash hands, and thoroughly dry.
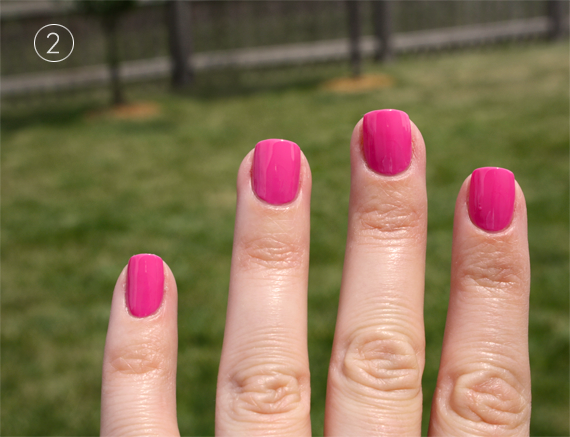
2. Paint two coats of your base color and allow to dry thoroughly.
3. On a clean disposable surface such as a paper plate or piece of paper, heavily paint two stripes of nail color close together.
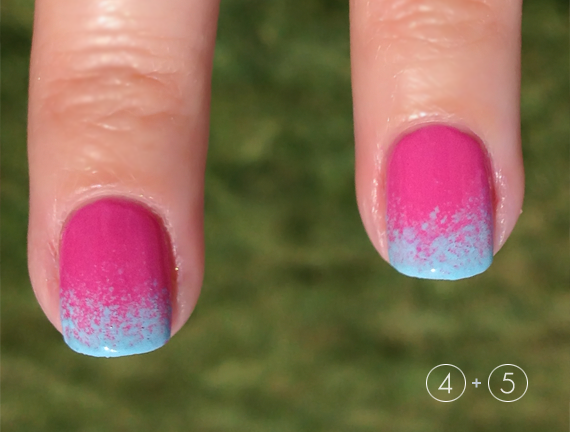
4. Dab the sponge in the polish and sponge the contrasting color onto the ends/tips of your nails. You can extend it as far as you want in order to get the desired effect. Continue with each nail until all are painted. I sometimes need to add a second coat of the contrasting color to have a more saturated effect on the tips.
TIP: Dip a paint brush or Q-tip in nail polish remover to clean any excess polish off of the skin around your nails.
5. Once the polish has thoroughly dried, apply your favorite top coat.
Have you ever done any sort of gradient manicure on your nails? If so, what technique do you prefer? Oh, and if you try this tutorial, we'd love to see pictures!


Nice!! : )
ReplyDeleteThat is really effective, thanks!
ReplyDeleteI love just about anything ombre, so this is perfect! =0)
ReplyDeleteOh, and - hooray for psychology teacher (was one of my fave subjects in school). Thanks to your sis!
~Kim
How cool! I love the colors you used and the sponge technique is so clever!
ReplyDeleteThanks for the tutorial :)
i love this. the two different colors and texture are really cool.
ReplyDeleteThis looks very doable, but I'm afraid I'll make the biggest mess ever made!
ReplyDeleteOh this is so cute and it looks simple! I just showed my boyfriend and he wants to try it out this weekend. He's such a sweetie!
ReplyDeleteChristen
http://christenlouise.blogspot.com
This is so fun and unique! I'm going to try it will some new green and blue Essie shades I bought this weekend. Thanks for sharing Morgan! =)
ReplyDeleteEeep!!! So cute!!! I've tried nails like this but your technique with a sponge is awesome!1
ReplyDeleteThis is perfect, not to mention this ring <3 I may try it with black and white lets see what how it will turn out even through I'm a mess with this kind of stuff this one looks easy he
ReplyDeleteI love this look!! So bright and summery and cute (:
ReplyDeletexx
Natalie | Salt & Sail
Thanks for your comments everyone! Morgan says thank you too! Hopefully she'll be back with another nail tutorial soon. xo, m
ReplyDelete