
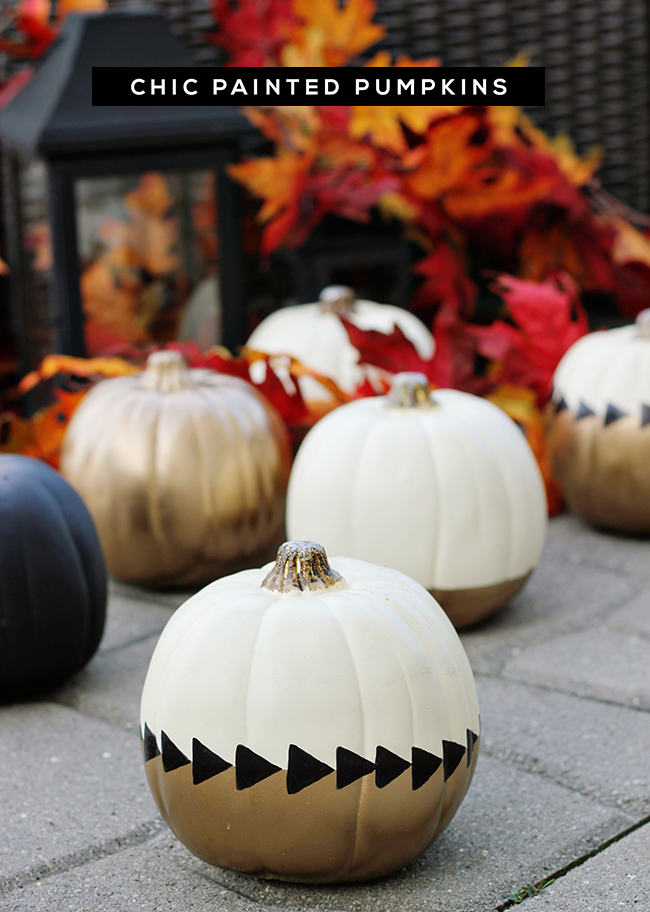
Halloween is one of my favorite holidays of the year when it comes to decorating. And although it's easy to find an abundance of decorations at just about any store, they tend to be more fun (and/or freaky) than stylish. As my regular readers know, I'm a big fan of white, black, and gold together (see what I mean in this painted bulletin board tutorial and this painted mason jar tutorial), and I started thinking up ways that I could bring this color combination into my Halloween decor. I love the way that white pumpkins look, so I decided to grab some plain old white craft store pumpkins (along with a couple big orange ones) and take them up a notch. I was thrilled with the results! With just a few supplies and less than $50, you can transform boring old foam pumpkins into beautiful pieces of autumn decor that you can use year after year. And as always, if you're not into this particular color combination, you can use any color paints that you like. The same goes for the pattern - you can paint/draw whatever you want. The only rules here are to have fun and let your creativity flow!

Supplies List
- 6-10 White foam craft store pumpkins
- 1 or 2 Large orange foam craft store pumpkins (optional)
- ScotchBlue™ Painter's Tape Original Multi-Use (2090)
- Gold metallic spraypaint
- Black flat spray paint
- Black acrylic paint and brush or a black paint marker
- Newspaper
- Mason jars (to use as holders for painting and drying)
- Cardboard (to place under pumpkins while painting)

Step 1. Tear off a piece of ScotchBlue™ Painter's Tape Original Multi-Use (2090) and place horizontally around the circumference of each pumpkin. Place at different heights from pumpkin to pumpkin. (You may also choose to leave a few without tape, to create some solid painted accent pumpkins.)

Step 2. Cover the tops of your pumpkins, from the tape line up, with pieces of newspaper, and use the ScotchBlue™ Painter's Tape to tape in place.

Step 3. Place your taped pumpkins with the newspaper down onto the tops of open mason jars set up on a large piece of cardboard or pieces of newspaper. This will allow you to paint your pumpkins without touching them, and for them to adequately dry.

Step 4. Spray the majority of your pumpkins with the gold paint, then the rest with the black paint. Allow to dry for several hours. (For any untaped pumpkins that will be painted solid, turn them over after the initial dry time, paint the other sides, then allow to dry for several hours.)


Step 5. Remove the ScotchBlue™ Painter's Tape and newspaper.

Step 6. On a few of the gold and white pumpkins, use black acrylic paint and a brush (or a black paint marker) to paint a single row of triangles/arrow heads. Allow to dry.

Step 7. You're done! Create a chic Halloween display with your pumpkins. I added a couple of simple black lanterns and let the pumpkins speak for themselves!


Enter the Home of ScotchBlue™ Painter’s Tape Contest at www.scotchblue.com/homecontest October 1, 2014 through November 15, 2014 and you could win $5,000 to put towards a home makeover! The first 500 to submit an eligible entry will receive one (1) roll of the new ScotchBlue™ Painter’s Tape with Advanced Edge-Lock™ Paint Line Protector!


Check out this project as a featured project example in the contest!
Contest open to legal residents of the U.S. and D.C. (excluding AZ, MD, NJ, ND, TN and VT), who are 18+ (19+ in AL & NE and 21+ in MS) at the time of entry. VOID WHERE PROHIBITED. Enter from October 1, 2014 at 12:00:01 a.m. CT through 11:59:59 p.m. CT on November 15, 2014. All contest communications, entry/judging criteria and details subject to the full Official Rules. To enter and for Official Rules, visit www.scotchblue.com/homecontest. Sponsor: 3M Construction and Home Improvement Markets Division, St. Paul, MN.
Project and photography by Melissa Baswell Williams. Assisted by Morgan Rainwater.
I am proud to be a 3M sponsored blogger, and, as part of my responsibilities, I get the opportunity to evaluate ScotchBlue™ Painter’s Tape. Opinions are my own and additional products used in the project were selected by me. Visit ScotchBlue™ on Twitter, Facebook, and Pinterest.

 |


These are great! Although Halloween isn't hugely popular over here, decorated pumpkins definitely are!
ReplyDeleteHow fun! I love the final touch of the black triangles...really steps them up a notch!
ReplyDeleteThese are gorgeous!
ReplyDeleteYou're right, I DO love these! Gold + spray paint + fall = my jam.
ReplyDeleteI thought you might. :)
DeleteThese look great! My only problem with painting pumpkins is that they can't go in the compost after. :/
ReplyDeleteMelissa
wildflwrchild.blogspot.com
These are foam pumpkins though. You can use them year after year! :)
DeleteEasily the prettiest pumpkins I've ever seen! I can't wait to make them!
ReplyDeleteNever thought pumpkins could look so chic! Love this!
ReplyDeleteCute and classy!!
ReplyDeleteEeeep!! These are so cool!!
ReplyDeleteThanks so much for your comments everybody! We had just a great time working on these. I'd love to see pictures if any of you make them. xo, m
ReplyDeleteBeautiful work! I love the classy look of the white gold and black together.
ReplyDeleteOkay, these are without a doubt the prettiest pumpkins I have ever seen. I never do anything for Halloween, but you have me seriously tempted to change that this year!
ReplyDeletexox,
Cee
These are awesome!
ReplyDeletewow great idea for the painted pumpkin. i like this idea. this is nice fun.
ReplyDeleteWhere did you get your foam pumpkins from?
ReplyDeleteI believe we got them from Michael's.
Delete